How to Root Moto G31 Without PC [Working]
Are you searching for a method that will provide how to root Moto G31 guide? If yes, you have landed on the right page, where you will obtain a dedicated guide for that.
I have covered the most convenient method to provide rooting features. Even though you are new, you will understand everything, so make sure to stick to the final section.
Do you know? If you don’t have a computer or laptop, you still root any android phone without PC support, except in that situation, you will need a secondary smartphone.
In that secondary smartphone, you will run the fastboot and ADB command to unlock those exciting features quickly. But if you didn’t desire to take that much trouble first.
You can also check out other options like KingRoot that directly root the device without any fastboot commands, but it might not be as secure as the upcoming steps guide.
Consider the magisk rooting method would be the safest choice as your chance won’t affect the phone. But before that, let’s understand what rooting is and its features.
What is Root?
The rooting directory is the system kernel file that primarily holds data and renders admin-level segment functional and features, controlling the overall system settings.
You will require access to the administer directory to root any android device to freely wander in the internal system and change system settings accurately to gain control.
You can boost the performance, add-up ROMs, change the UI elements, and unlock various things with those traits. But, it’s necessary to learn about the pros and cons.
Advantage of Root Moto G31
There are tons of specialties that you can try out on your phone. Besides this, you will acquire several customization attributes to build a personalized interface ecosystem.
Furthermore, you will receive immersive overclocking and underclocking software that will boost the performance or decrease the processing power to increase battery life.
Disadvantage of Root Moto G31
If you use overclocking section for a long time, there is a high chance that overheating problems arise, and in a worst-case scenario, it’s a meltdown in the internal hardware.
Apart from this, you will lose warranty privileges since unlocking the bootloader will violate company policies, and if the handset becomes brick, it can’t be repaired again.
Before You Start
- Firstly, you are required to save your old data and backup it in a secure place.
- The next thing you require to do is unlock bootloader on any Motorola phone.
- Ensure that the phone is fueled correctly. More than 60% battery life is needed.
- If you are rooting a handset without a computer, you will require a secondary smartphone to aid access the ADB and fastboot command in the latter parts.
How to Root Moto G31 Using Magisk
Disclaimer: Magisk Uptade is not accountable for any harm to the user’s device. Moreover, there’s a risk of bootloop or brick, and if you are aware of that, move forward. If you want to perform the method thoroughly, fill in the requirements.
Step 1 – Grab the mobile adb and TWRP file
- Now that you have opened the bootloaders settings, get the latest version of the TWRP custom recovery to add new features to your device hassle-freely.
- After downloading the TWRP to your device, put the device is in fastboot mode.
- Check out the device fastboot pattern. Usually, it’s the Volume Up + Power key.
- Afterward, you have to download the Bugjaeger app on the secondary phone and connect both devices with an OTG cable to flash the TWRP file quickly.
Note: Confirm that you have downloaded the TWRP files on the primary smartphone!
Step 2 – Run commands to install TWRP file
- Enter the Bugjaeger ADB commands app and head toward the flash section.
- Tap on the flash section and enter the first command – fastboot devices – first.
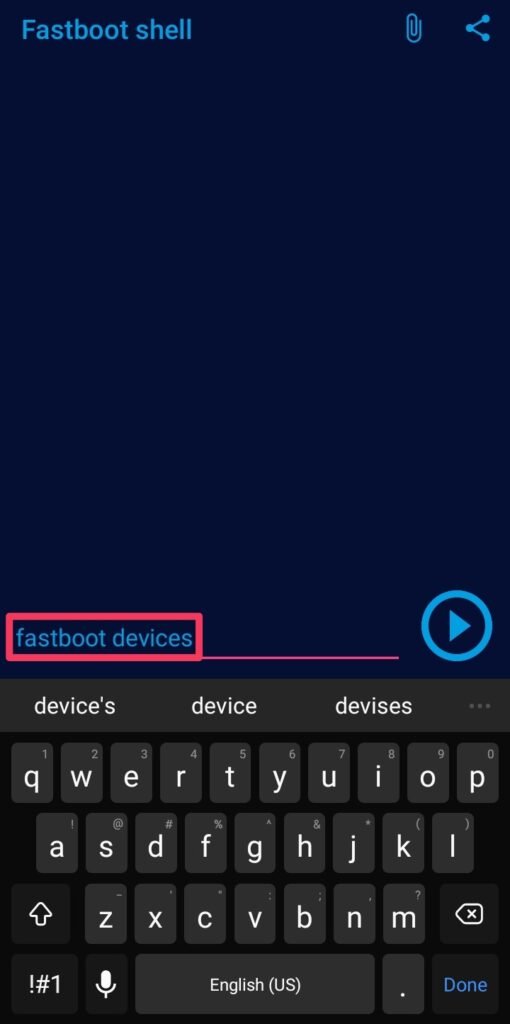
- This command will show that the device is connected to the secondary phone.
- Next, you have to enter – fastboot flash recovery – command to flash recovery.
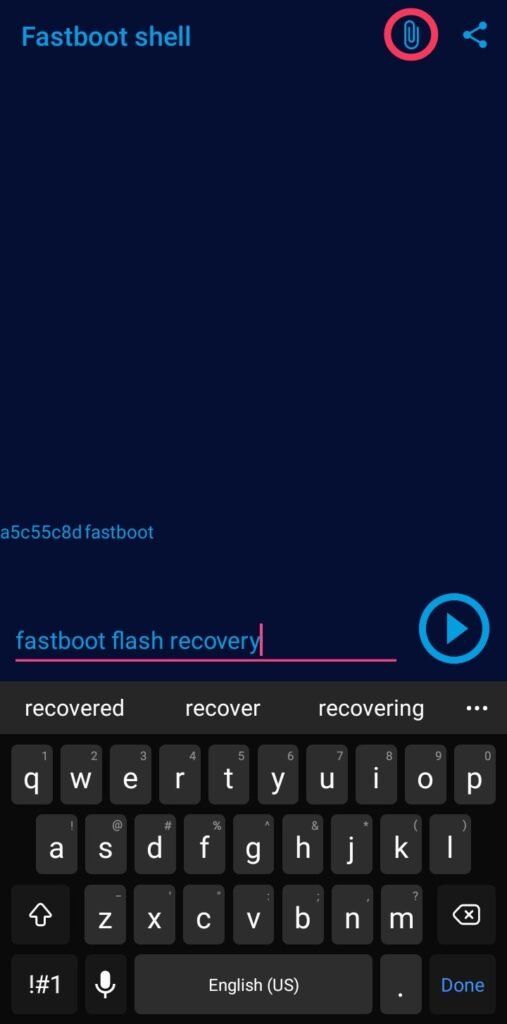
- After writing this, go to the Add file option and navigate the TWRP file location. Select the flashable zip file to continue the process further in a simple manner.
- Tap on the Play Button to get ready for the action. Wait till the phone reboot.
Step 3 – Let’s start magisk flashing process
- Download the Magisk zip file to get started to unleash those exciting features.
- Long press the Power + Volume Up button combo to enter the recovery mode.
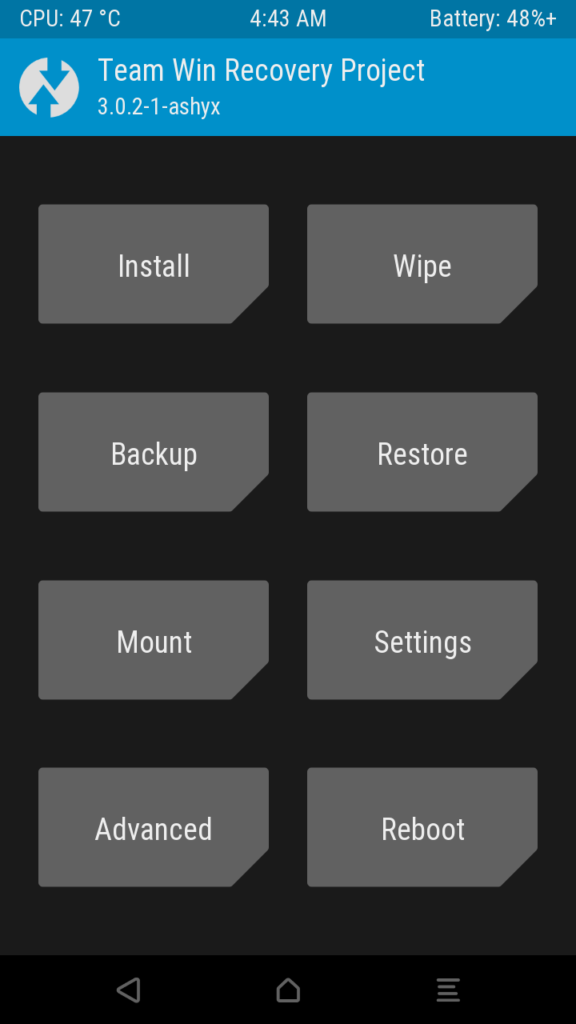
- Tap on the Install icon and go to the magisk file location in the internal storage.
- Click on the file and swipe to start the flashing process to get rooting features.

- Afterward, download the latest Magisk app to review whether those privileges are unlocked to you. If not, attempt to reflash the zip file to obtain better results.
Related Article:
Worry not! You have achieved those impressive features set and now wander into the system settings, unlock endless customization traits, and much more exciting things.
Alongside this, you will acquire robust tons of additional features. While, if something didn’t work out in your case, you can go to the comment section or ask on telegram.