How to Root Samsung Galaxy A03 Using Magisk
Desire to modify the system settings and want the next level customization traits with ROMs? For all of that, you will be needed how to root Samsung Galaxy A03 guide!
In this post, you will receive everything to start the rooting process from scratch, while I have noted down a few points that will aid you in following the instructions guide.
Like many users, you want to transform the interface layout and want custom traits that work according to your wish, then rooting the device comes in handy in that case.
For starters, you need the guide that allows you to root any android phone accurately, then start with unlocking the bootloader, flash recovery, and installing Magisk help.
On the other hand, you can depend on a third-party apk that directly grants those opt features but makes the device a bit more vulnerable than before due to the process.
Therefore, you might obtain those impressive attributes, but there’s still some risk left behind your back, it’s necessary to understand what root is and rooting pros and cons.
What is Root?
The core section where all the system and users’ file data is stored in the root directory. And alongside this, it also equips admin directory features. But, users can enter here.
As the by-product, you will attain several impressive things that include administering privileges, system customization, ROM installation, firmware update, and many more.
Although, you have to evade the security factors of the phone, which might also result in some collateral damage. So, let’s comprehend info about the pros and cons part.
Advantages of Root Samsung Galaxy A03
You can freely access the system settings! Thanks to the admin’s privileges. It permits users to enter the internal partition software and renders complete control accurately.
You will also obtain options that expand the cloaking speed of the processor to render a better gaming experience, while custom ROMs will add different layers of attributes.
Disadvantages of Root Samsung Galaxy A03
First and foremost, you are violating smartphone companies’ policies by unlocking the bootloader, which results in warranty privileges failure when you damage the device.
Moreover, the security barriers have been lifted. Thus, the device will be vulnerable to malicious viruses, malware, and spyware that can sabotage beautiful UI experience.
Before You Start
- The first step that you need to unleash the true power of the phone is to unlock bootloader on Samsung phones to follow up the upcoming steps conveniently.
- Moreover, make sure that your smartphone is charged more than 60% or above would be great as rooting will take a few hours. We recommend fueling 90%.
How to Root Samsung Galaxy A03 Using Magisk
Disclaimer: You need to be aware that this patching method is tricky and risky. Magiskupdate is not responsible for any damage to the reader device. So do it everything carefully. Download and install the Samsung USB driver to your PC.
Steps 1 – Preparing the boot image file
- Let’s start with grabbing the latest Stock Firmware of your smartphone, while on the other hand installing the Odin flash tool to apply the usual commands.
- As for the next step, you enter in stock firmware folder and select the “AP” file.
- Right-click and unzip the “AP” file through the 7zip tool to extract all content.
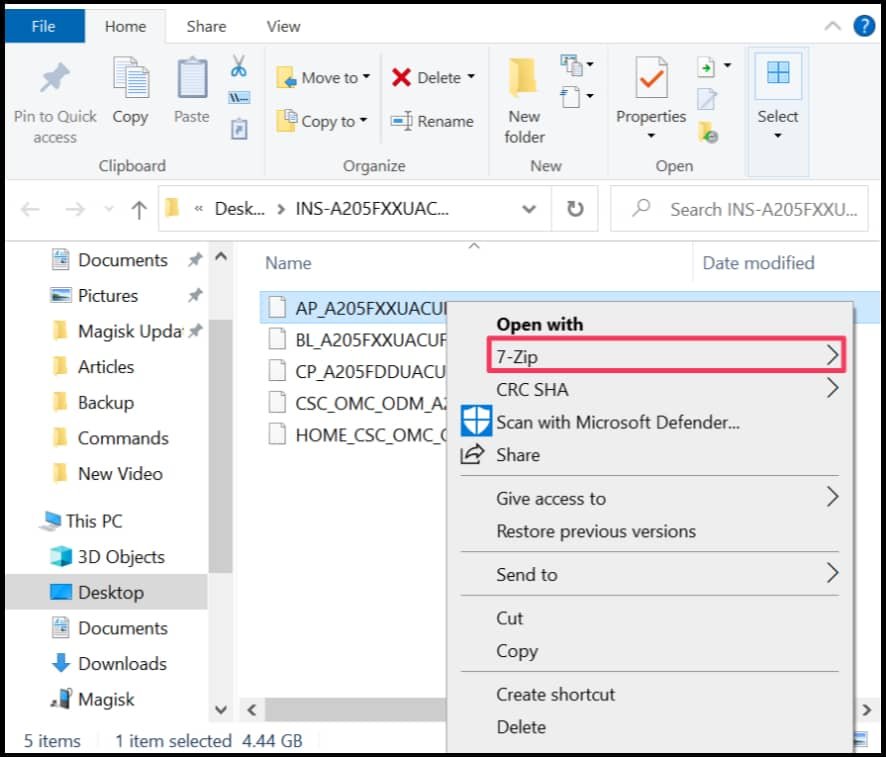
- Enter 7zip, then go to the “Add to archive” to change the file archive format.
- You must transfer the .lz4 file format to .tar and click “OK” to continue forward.
- Transport newly extracted boot.img.tar file to the phone through a USB cable.
Step 2 – Patching the boot image file
- Download and install the latest Magisk App into your smartphone accurately.
- To patch the boot file, tap on the install section and navigate boot.img.tar file.
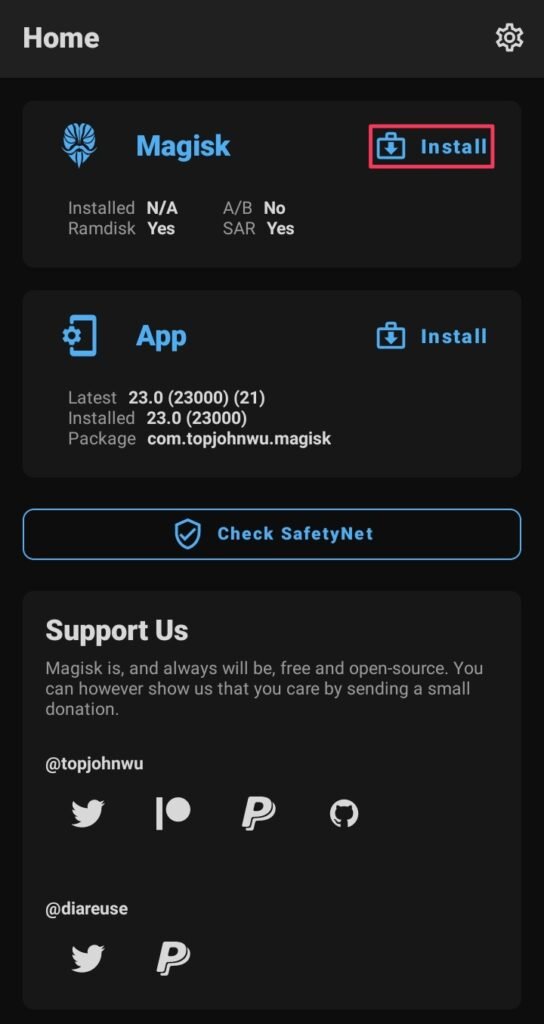
- Reach out to the location and press the boot file to start the patching process.
- From this method, the magisk_patched.tar file will appear in the same place.
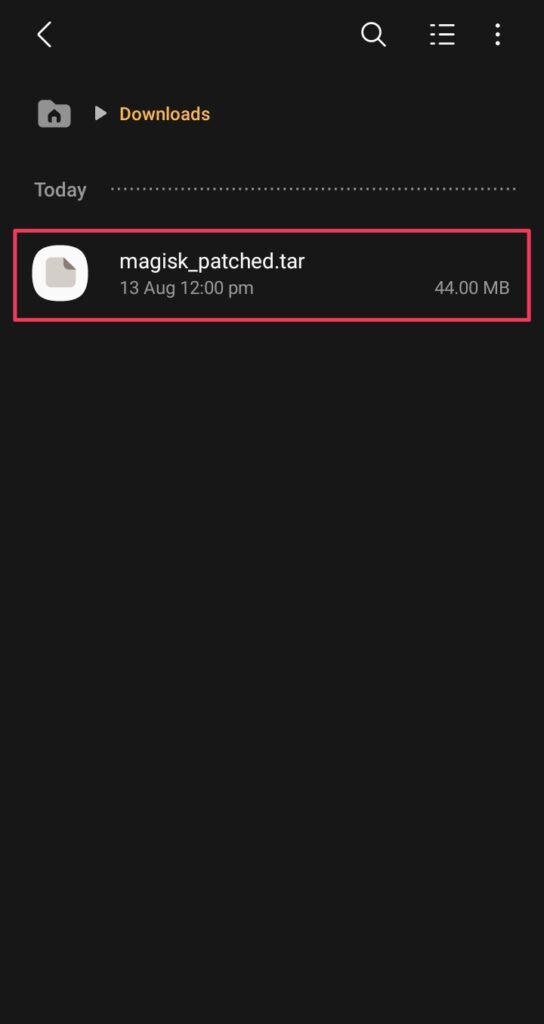
- Transfer this file to the computer to access the system commands features.
- Put your phone in the download mode by pressing the fastboot combination.
Note: Every Samsung device arrives with a distinctive fastboot combination, so make sure to check your phone’s download mode pattern to utilize the upcoming phases.
Step 3 – Flash the patched boot image file
- Enter in the Odin Flash Tool, and there, check whether the phone is connected or not! If you face any issues, reconnect the device after entering the fastboot.
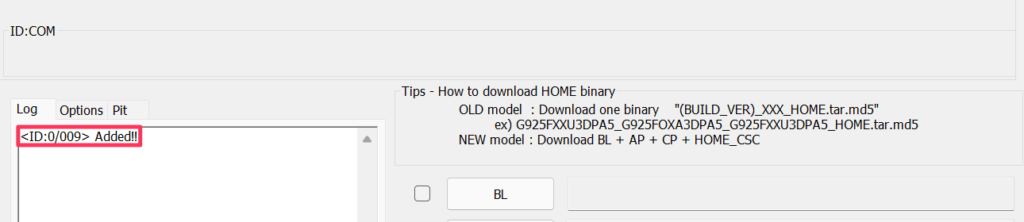
- Tap on the “AP” section, and paste the magisk_patched.tar location in the box.
- You have to untick the “Auto-Reboot” from the left corner to do it subsequently.
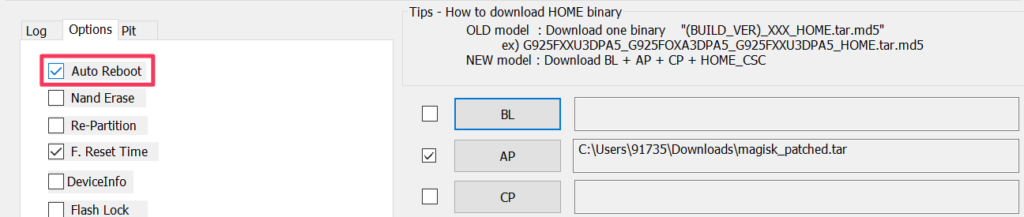
- Afterward, tap on the “Start” button to initialize the flashing process of the file.
Step 4 – Re-installing the Magisk App
- Remove the data cable connecting the PC and phone and enter the fastboot mode by pressing the Volume Down and Power button to join the boot section.
- Wait till the Samsung logo doesn’t appear and navigate through Volume keys.
- Select the factory reset option and wipe out all the data for smooth usage later.
- Download the latest version of magisk to appreciate those rooting privileges.
Related Article:
I hope that you have unlocked those fascinating traits for your Galaxy A03. Now, enter into the customization world paradise where you have the solution to every problem.
With this setup, you can make a personalized interface according to your desired way. If you face any issues while reading the guide, do let us know in the comments area.