
How to Root Samsung Galaxy A11 – Two Authentic Methods
Do you want to reach new heights in your smartphone settings? Kudos! Because you have come across a complete guide to root Samsung Galaxy A11.
Hi there, I hope you are doing well in your life. In this post, I have covered various ways in which applying rooting traits on any Samsung device becomes a hassle-free chore. Are you ready to unleash the true power of your phone? Yes, I’m ready!
But before you get started, you need to take care of a handful of things that contain the rooting downsides and pre-requirement for every process. Worry not about anything and simply stick to the end to root with Magisk, KingRoot, and many more!
With that said, let’s start with the basics of rooting and what it does!
What is Root?
Root is like a heart that pumps data in the different sections of the operating system. The primary work of the root directory is to store data from the system and apps.
Aside from this, a major portion of user data is also included. These data files can be accessed through the administer privileges. However, a normal user won’t earn those power in the first place nor did the smartphone company grant those permissions.
Why Root Samsung Galaxy A11?
Usually, the phone makers didn’t grant the system access due to security compromises, while at the same time, it hampers the overall smartphone limits into multiple folds.
But if you are looking for those superuser features that allow you to effortlessly enter into the system settings without hassle, first, you require complete root access. Apart from this, you apply modification in the interface layout using unique custom ROMs.
You will receive lots of exciting things compared to the factors covered in the above section, so let’s understand the advantages of rooting any Samsung phone.
Advantages
If you are thinking that removing bloatware apps is fun, there are still numerous things that you can explore with those fascinating rooting benefits. You can modify the interface layout according to your desire with the advanced-level custom ROMs options.
Apart from this, you will gain total authority over the entire Android ecosystem, while you can delete or add different system software. Long story short, you can transform the whole interface settings with some other brand UI skin smoothly.
Disadvantages
The performance aspect sometimes causes trouble and you won’t able to use your phone as you used to before. Some users point out that they are facing lag issues.
You might receive the blessing of overclocking software, but it can also generate an overheating problem for the device and prove a bad decision to root Samsung Galaxy A11. So make a firm decision before you start following the instruction.
How to Root Samsung Galaxy A11?
You can use flashable zip options like Magisk and SuperSU to attain rooting attributes. Usually, you have unlocked the bootloader to flash those amazing functions.
On the other hand, there are three-party apps like KingoRoot, KingRoot, Dr.Fone that will provide those exciting system settings without any cost. You can choose anything that fits best according to requirements and daily usage needs.
Before you move to apply the rooting aspect to your phone, we suggest reading the pre-requirement that contains essential information before you start any process.
Pre-requirement
- Your Samsung phone needs to fuel more than 60% or above.
- Get the USB cable to connect both the PC and smartphone.
- Every method different zip file, software, apk, so download each.
- Make sure to take complete data backup to avoid data loss.
- Some processes require unlocking the bootloader settings.
Disclaimer: MagiskUpdate is not accountable for any loss, while we recommend you complete the requirement of each method before you started rooting.
Method#1: Root Samsung Galaxy A11 Using Magisk
If you want to experience root Android phones with ease, you should prefer using the magisk solution. With this, you will acquire a higher rooting success rate easily.
- Firstly, download and extract your phone firmware zip.
- Inside the folder, copy the AP file and transfer it to your phone.
- Open the recently downloaded Magisk application first.
- Tap on the Install Button and select a patch file option.
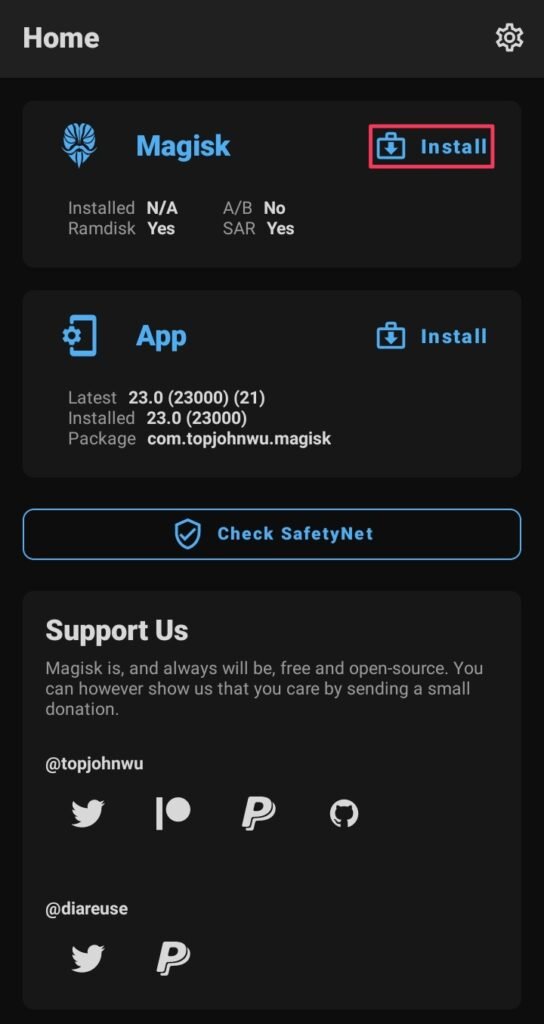
- Following this, navigate to the AP file location, click on it.
- A new magisk.tar file will replace the AP file location, transfer that to PC.

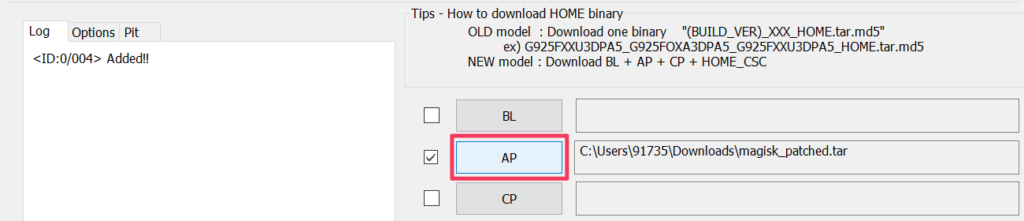
- I hope that you have already extracted the Odin flash tool folder.
- Open it and connect your phone using a USB cable (in download mode).
- Next, you have to click on the AP and go to the magisk.tar file location.
- Also, disable Auto-reboot function, and finally, press on the Start.
- After a moment, you have successfully rooted your Samsung phone.
Method#2: Root Samsung Galaxy A11 Using KingoRoot
Like the previous method, you can easily download and install the Kingo Root app over your phone and enjoy the next-level customization attribute without any ado.
Therefore, let’s begin the rooting process using the KingoRoot.
- First and foremost, head to the official KingoRoot website via any browser.
- Now, download the latest version of the KingoRoot for android phones.
- Afterward, go to the download folder and start installing the app package.
- Following this, you have to open the KingoRoot app to start rooting.
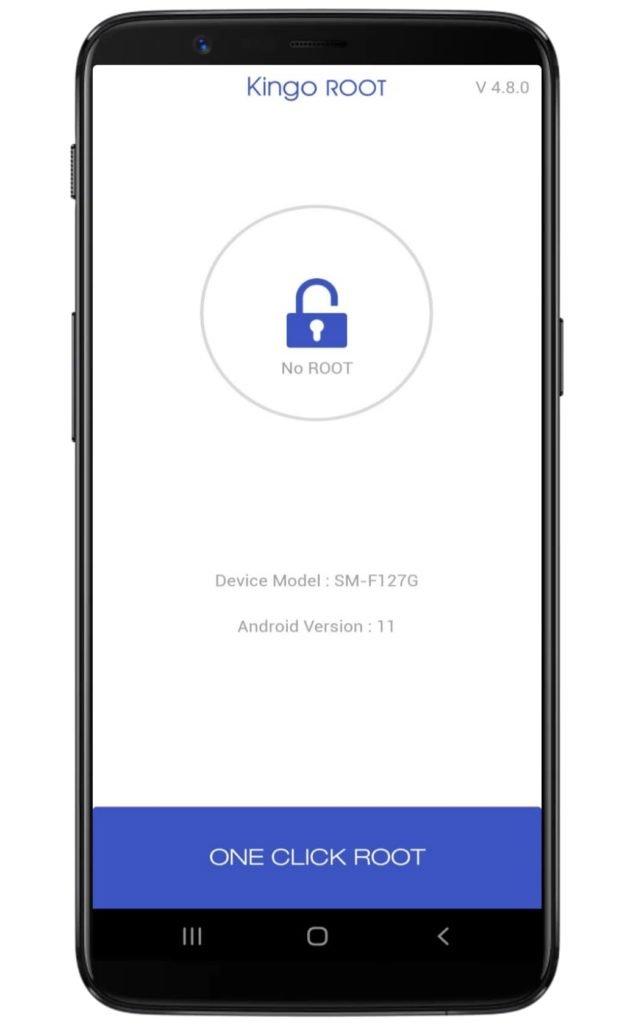
- Tap on the Root Button to begin the percentage stats procedure.
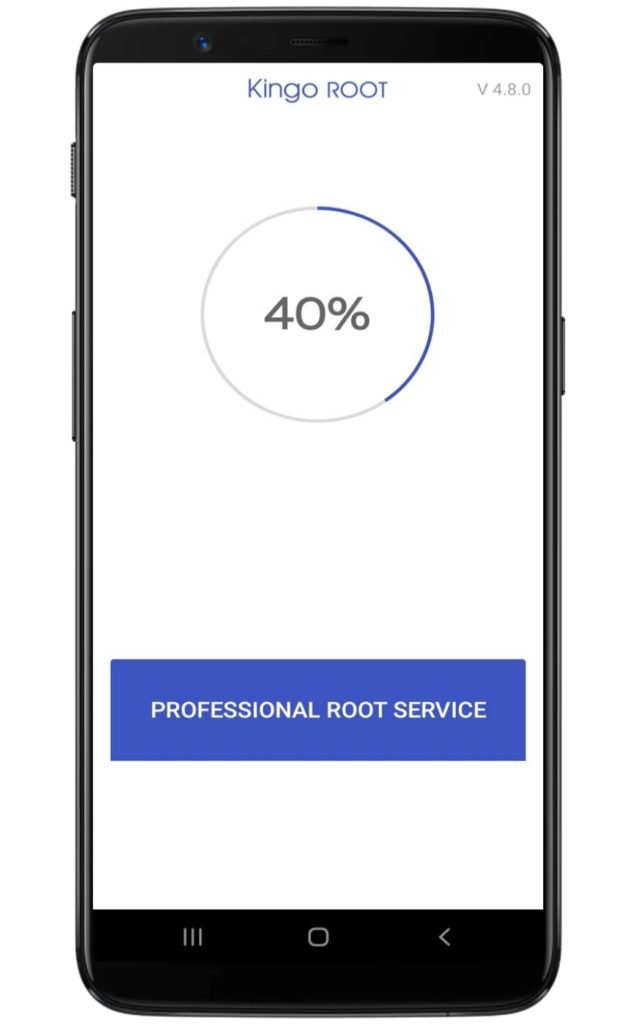
- With this, you can root any Samsung phone using KingoRoot apk.
You can also confirm the root access status using the root checker app. Simply get it from the Google Playstore to confirm everything once for all. On the other hand, if you facing any problems with applying this method, you can try out the following phone.
Final Verdict
Bingo! You have completed the walkthrough to root Samsung Galaxy A11 in which we have covered different methods to root Samsung devices without any hassle.
On the other hand, if your mind is stuck somewhere between any guide/method, do let us know in the following comment section about it thoroughly to get a solution ASAP.


Which twrp to use for Samsung Galaxy a11, can’t find the right one
hey bro, today I am updating this article with working methods and the best thing is this guide is without TWRP.
Link “Install TWRP recovery on Samsung Galaxy phone” is not working.
We are sorry for this, but don’t worry today my team update this article with working methods..??
My phone bootlooped, but only when I’m booting it with magisk. I can still use it without magisk. Please help
Today my team update this article with a testing method. So you read both steps carefully.
Hi, it is said “3. Now copy “AP.tar.md5” then transfer your internal storage”.
Where I can get “AP.tar.md5”? And we should transfer the internal storage?
You get the “AP” file from the firmware file link in the above section.
ah, it’s “AP_*.tar.md5”, i see, thank You.
My English is not very well, but is not there a typo in “transfer your internal storage”? Shouldn’t it be “transfer _to_ your internal storage”
i stuck on step 7 after succesfully pass with odin, how can i continue to next step?
1. The important thing how you can boot into the system. press volume down and power button to turn off your Samsung Galaxy A11
2. Immediately press and hold volume up + power button as soon as open bootup logo release power key but don’t release the volume up key
3. Wipe all the data and enjoy magisk manager
and should we or should we not include the BL, CP, etc. files?
When I install twrp my phone goes into bootloop( download mode all the time have to flash rom again to get phone working again)
Can’t find the correct twrp tried all of them.please help.