How to Root Samsung Galaxy A32 Using Magisk
In this guide, I will show you how to root Samsung Galaxy A32 using magisk.
You have been thinking of installing rooting features on your phone for a while, isn’t that right? Ring the bells since you have landed on the right page, here you will get a precise way! But before heading there, let’s have a quick chat over the core specs.
Are you excited about a quick overview of the specification of the smartphone?
This smartphone launch in the Indian market on 26th August 2021. Talking about camera sensor 48MP + 8MP + 5MP + 2MP quad primary setup. Dimensity 720 processor powers Samsung Galaxy A32 with 4GB Ram and 64GB storage. The smartphone was coming with 6.5 inches (16.51 cm) 270 PPI, IPS LCD. We are moving to battery performance is 5000 mAh, USB Type-C Port with Fast Charging before starting the guide; Let’s understand what is rooting?
What is Root?
The rooting directory is the primary data storage directory that contains every unit’s internal data, which cope up apps and systems partitions, alongside admin privileges.
Besides this, rooting your phone provides the superuser access to those fundamental directories. While also rendering administer settings into your palm with zero hassle.
On the other hand, few minimal flaws might disrupt you nice and sweet experience with those exciting trait. So, let’s visit the pros and cons factors to grasp the process.
Here are some Points to Remember while Rooting
- Ensure your smartphone bootloader has unlocked. You can also follow our guide to unlocking the bootloader on any samsung phone.
- We recommend that your smartphone battery has been charged more than 40% because a lot of time required for the rooting procedure.
Advantage of Root Samsung Galaxy A32
There are rooted apps, modules, custom ROMs that will enhance the screen time via clean the background apps when they aren’t in use and optimized settings precisely.
Under the hood, the processing cores are the basic unit that works hard to provide a subtle speedy experience, but with the rooting traits, overclock to the true potential.
Disadvantage of Root Samsung Galaxy A32
If you didn’t take a backup before the process, you lose your smartphone data. While at the same time, it’s difficult to restore due to the factory reset procedure happens.
The bootloop issues are quite general when you install incompatible software into the system files. Therefore, try to avoid ROMs that are not compatible with the device.
Disclaimer: You need to be aware that this patching method is tricky and risky. Magiskupdate is not responsible for any damage to the reader device. So do it everything carefully. Download and install the Samsung USB driver to your PC.
How to Root Samsung Galaxy A32 Using Magisk
Preparing the boot image file
- Ensure that you have put the magisk app, Odin tool, and Stock Firmware file in the same folder since you will need them frequently during the procedure.
- Enter in the stock firmware file folder and extract the “AP” file through the 7zip.

- Tap on a newly extracted folder. There, you have to right-click on the boot file.
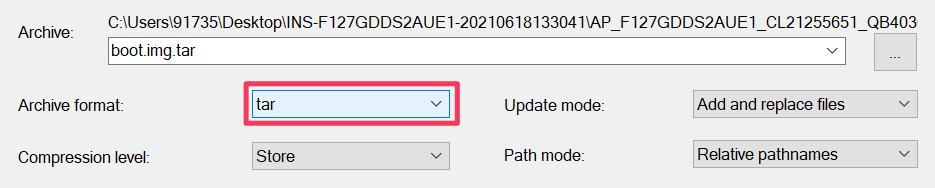
- Now choice 7zip then the “Add to archive” option to change an archive format.

- Select and change the archive format from .lz4 to .tar, then hit the OK button.
- Copy the boot .tar file into your Android smartphone for the patching process.
Patching the boot image file
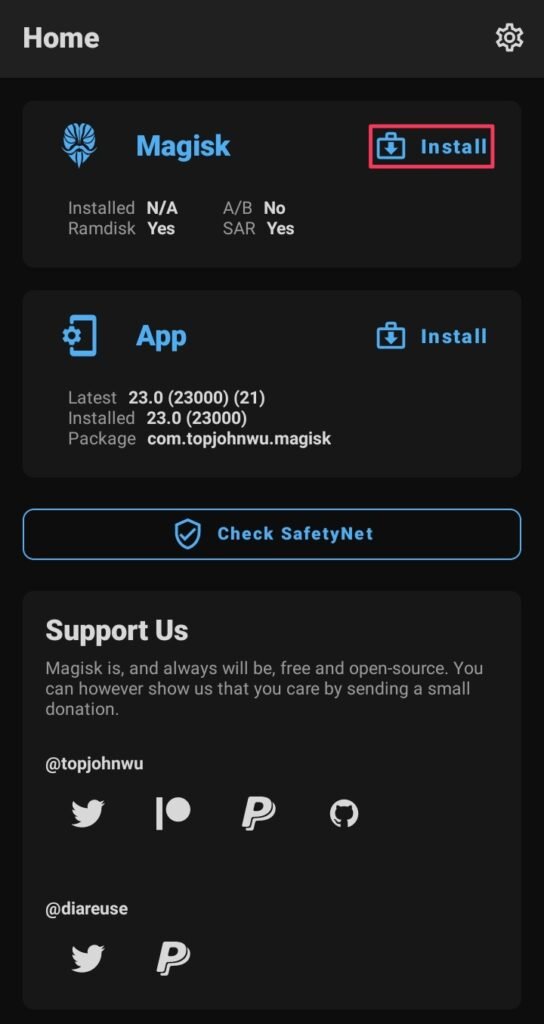
- Download and install Magisk App and tap on the install option inside the apk.
- Navigate to the storage unit part where you have saved in device boot .tar file.
- Once you tap on that file, the patching process will automatically be initialized.
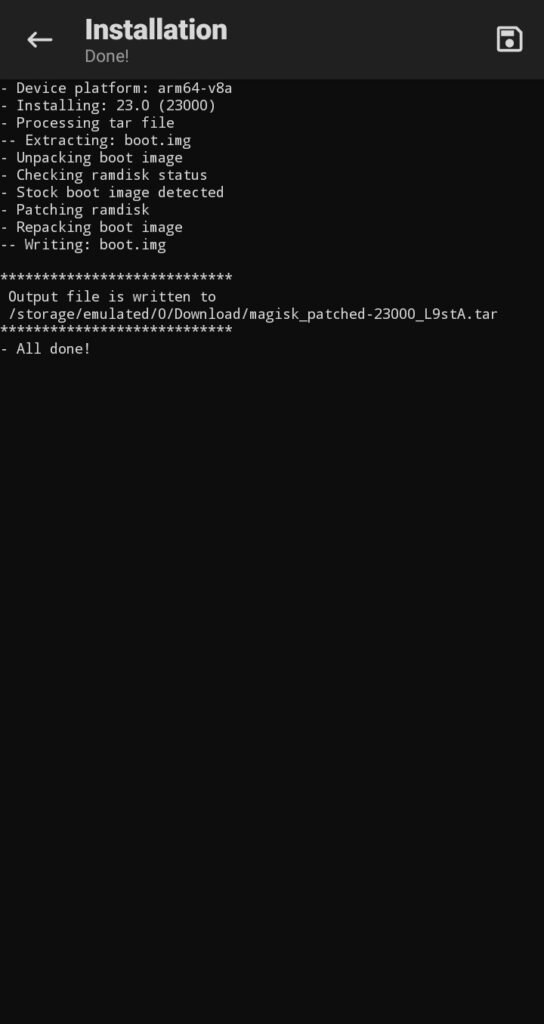
- From this, you will obtain the magisk_patched.tar file at the exact location.

- Deliver that .tar file to the PC, and connect your phone into download mode.
- Turn off the phone, and press both volume keys while connecting to the PC.
Note: Unlock the bootloader of your Samsung phone before commencing the process.
Flash the patched boot image file
- Open the Odin Flash Tool, there, you will notice that the device is connected, but if that’s not showing in your case, perform the last two steps once again.
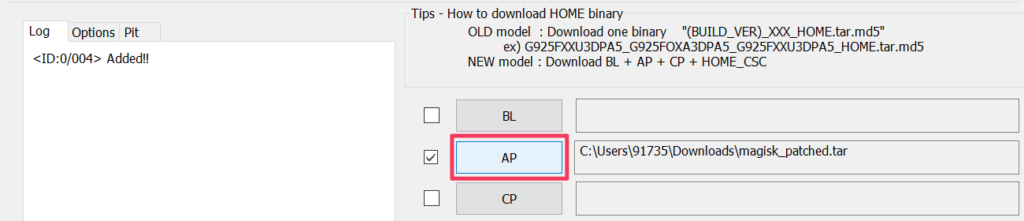
- Head toward the “AP” section, then drag and drop the magisk patched .tar file.
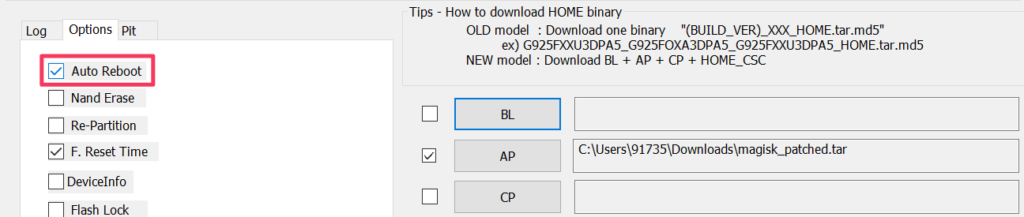
- In the left corner, you have to untick the “Auto-reboot” option to boot manually.
- Now, simply tap on the start button to initialize the final patching procedure.
Re-installing the Magisk App
- Remove the data cable once the flashing process ends, then press and hold the Volume down + Power Button until the Samsung logo with alert appears.
- Release both button and long-press Volume Up key to enter in the recovery.
- Apply the factory reset setting and safely reboot the phone in the usual way.
- Download the Magisk App from this guide and install it properly, so it works.
Once the reboot process end, the magisk will fully install with your phone, now enjoy!
Related Article:
Kudos, you have reached out to the finishing line; from here onwards, you have the power to transform the system setting, getting OEM updates faster, and many more.
Yet, if you come across an uncertain discovery and it’s bothering you, do let us know what didn’t work in your case in the following section to collect the aptest answers.